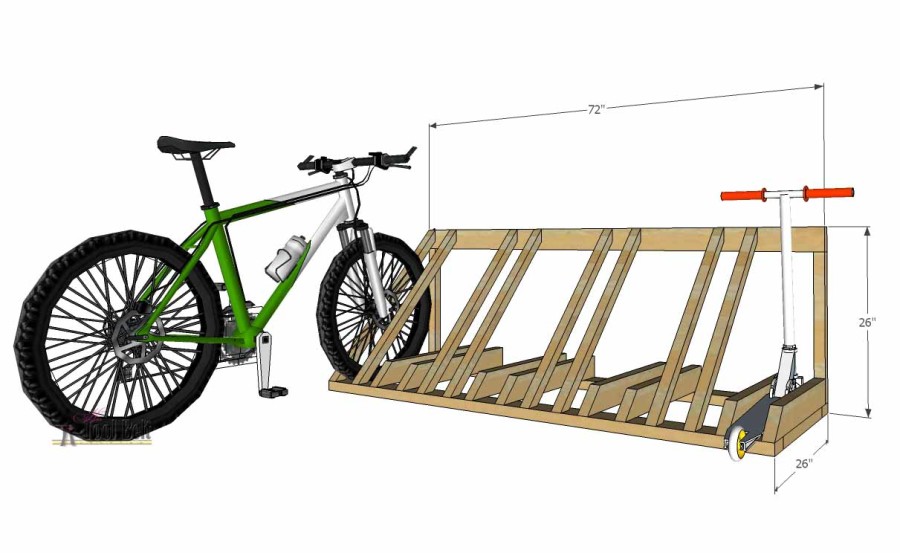

Looking for a stylish and functional way to store your bikes? Building a DIY wooden bike rack is a great project for any skill level! Here's a guide to get you started:
Materials:
Wood:
2x4s or 2x6s (depending on bike size and desired height)
Plywood for the base (optional, for added stability)
Hardware:
Wood screws
Wood glue
Heavy-duty casters (optional, for easy movement)
Tools:
Measuring tape
Pencil
Saw (circular saw or hand saw)
Drill
Screwdriver
Optional:
Sandpaper
Wood stain or paint
Finishing oil or sealant
Design Options:
Vertical Wall Mount: A space-saving design for smaller areas.
Freestanding A-Frame: A classic and sturdy option.
Horizontal Floor Stand: For larger spaces and easy bike access.
Instructions (Example: Freestanding A-Frame Rack):
1. Planning & Cutting:
Determine the desired height and width of the rack.
Calculate the length of the base pieces and the support beams.
Cut the wood according to your measurements.
Assembling the Base:
Lay two base pieces parallel, creating the width of the rack.
Attach the support beams to the base pieces, creating the "A" shape. Use wood glue and screws for a strong connection.
Creating the Bike Hangers:
Cut additional pieces of 2x4s to desired lengths for the bike hangers.
Attach them to the support beams, making sure they are spaced appropriately for your bike's width. You can use hooks, brackets, or simply cut a notch in the wood for the bike tires.
Finishing:
Sand down the edges of the rack for a smooth finish.
Apply wood stain or paint for a desired look.
Consider adding a sealant for protection against weather and scratches.
Attach casters to the base (optional) for mobility.
Tips & Ideas:
Measure carefully and mark the wood precisely before cutting.
Use pilot holes before drilling screws to prevent wood splitting.
Pre-drill holes for the casters to ensure a secure fit.
Consider adding a shelf to the rack for storing tools or accessories.
Personalize your rack by adding decorative details, such as a custom sign or painted designs.
Safety Precautions:
Always use safety glasses when using power tools.
Keep fingers away from the blade when sawing.
Use a sturdy work surface and ensure that all tools are in good working order.
This DIY wooden bike rack project allows you to create a personalized and functional storage solution while also adding a touch of rustic charm to your space. Be creative, and enjoy the process of building your own!


No comments:
Post a Comment